Overview
This procedure will allow you to set up FileVault disk encryption on your Apple laptop or workstation, so that if your Apple device is lost or stolen, the data on the physical hard disk will be protected from unauthorized access.
PLEASE NOTE: FileVault disk encryption prevents the hard disk in your workstation from being accessed while the operating system (OS X) is not running. In order to provide an appropriate level of protection against attack while the workstation is running, you should always assign a complex password to all local user accounts, particularly those with administrative or elevated rights (accounts which can make changes to the workstation, change or otherwise manipulate user accounts, file and folder permissions for multiple users, etc.). We recommend setting passwords that, at a minimum, are made up of at least 12 characters, including at least one digit (0-9), and at least one of the following ‘special’ characters: ! @ # $ * ( ) - _ ; : / ? . , However, the longer and more complex password is, the less likely it will be easily ‘guessed’ or ‘attacked’ by an unauthorized user.
Prerequisites
- You must be an administrator on the workstation or laptop you wish to protect.
- You must also set passwords on all administrative accounts as specified above.
- If you are performing this procedure on a laptop computer, you will need to attach the power adapter to the workstation, and be able to leave it connected to A/C power for several hours after initiating the process.
Setup Procedure
- With the operating system up and running, click on the “Apple” menu in the upper left-hand corner of the screen, and choose “System Preferences”
- From the top row of icons in the System Preferences panel, choose “Security & Privacy”.
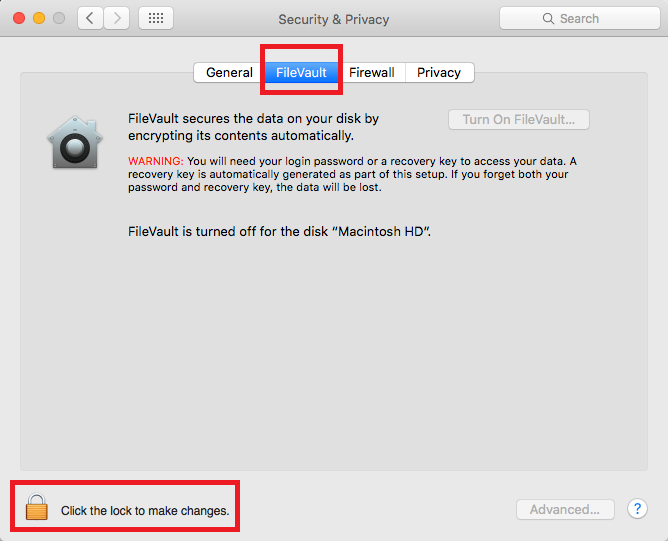
- From the “Security & Privacy” panel, select the “FileVault” tab, and click the “Lock” icon in the lower left-hand side of the panel to unlock the panel. You will be challenged for your administrative username and password.

- You may be asked to “enable a user account” for multiple users of the computer (if there are multiple user accounts on the workstation). Only one administrative user will be required to enable FileVault, however other users will be challenged for their username and password on boot once FileVault is enabled. Click “Continue”.
- Next, you will be presented with a “Recovery Key” panel. The key listed in this panel will be REQUIRED if you ever forget your password, or are otherwise locked out of your workstation. If you are ever locked out, without this key, neither Information Services nor Apple will be unable to assist you with ANY data recovery from this workstation. As such, we request that you HIGHLIGHT the recovery key listed on this panel, COPY it to your clipboard (Apple Key + C or right-click and choose “Copy”), and PASTE it into an email and send it to macencryption@depaul.edu, along with a copy of the serial number of the workstation for future reference. You can access your serial number by going to: Apple menu -> “About this Mac” -> More Info-> Serial Number (copy and paste this as well).
Information Services will keep a copy of the key in secure storage in the event that you ever need it for data recovery.
This will also serve as evidence that if the laptop or workstation is ever lost or stolen, DePaul University will be able to prove that data on the disk was protected by strong passwords and high-level disk encryption.
Keep in mind that this is NOT a password for your computer, but a recovery key that can only be used in combination with physical access to your workstation, so if you also choose to print this key as an additional safety measure, DO NOT keep the print-out with the workstation (in your office, laptop bag, etc.). Doing so would allow an attacker to easily bypass the disk encryption we are setting up in this procedure.
- Next, you will be asked if you wish to store a copy of the recovery key with Apple, associated with YOUR iTunes/Apple account. Because this hardware is University owned, we request that you do not store a copy with Apple, and instead send a copy of the key, as highlighted above, to Information Services.
- Last, you will be asked to restart the workstation in order to begin the drive encryption process. While the workstation is performing the encryption process, you will be able to log in and use the workstation, but for several hours (depending on the size of the disk), you may find the performance of the workstation impacted by the process. Performance will be restored to normal* once the process has completed. During the encryption process, you can check on the status by accessing the FileVault tab of the “Security & Privacy” System Preferences panel once the workstation has rebooted and you have logged back into the device.
Once you have completed these steps, your hard drive encryption should be complete. If you run into an issue and need to access your key, please contact the TSC to get the key that you submitted to Information Services in step 4.